Tuesday, November 29, 2011

66-Blocks | Copper Cable for Voice Applications


The 66-block was the most common of the punch-down blocks. It was used with telephone cabling for many years, but is not used in modern structured wiring installations. A number of different types of 66-blocks exist, but the most common is the 66M1-50 pictured in Figure 1.

 
Figure 1: A 66-block
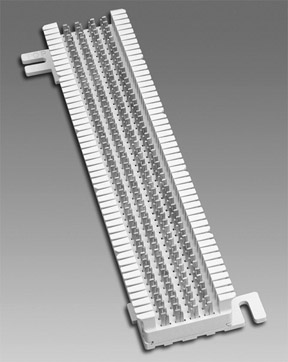
The 66M1-50 has 50 horizontal rows of IDC connectors; each row consists of four prongs called bifurcated contact prongs. A side view of a row of contact prongs is shown in Figure 2. They are called bifurcated contact prongs because they are split in two pieces. The wire is inserted between one of the clips, and then the punch-down (impact) tool applies pressure to insert the wire between the two parts of the clip.

 
Figure 2: The 66-block contact prongs
The clips are labeled 1, 2, 3, and 4. The 66-block clips in Figure 2 show that the two clips on the left (clips 1 and 2) are electrically connected together, as are the two clips (clips 3 and 4) on the right. However, the two sets of clips are not electrically connected to one another. Wires can be terminated on both sides of the 66-block, and a metal "bridging" clip is inserted between clips 1 and 2 and clips 3 and 4. This bridging clip mechanically and electrically joins the two sides together. The advantage to this is that the sides can be disconnected easily if you need to troubleshoot a problem.
Note 
Some 66-blocks have a 50-pin Telco connector on one side of the 66-block.
Figure 3 shows a common use of the 66-block; in this diagram, the phone lines from the phone company are connected to one side of the block. The lines into the PBX are connected on the other side. When the company is ready to turn the phone service on, the bridge clips are inserted, which makes the connection.

 
Figure 3: A 66-block separating phone company lines from the phone system
Note 
The 66-blocks are typically designed for solid-conductor cable. Stranded-conductor cables will easily come loose from the IDC-style connectors. Stranded-conductor 66-blocks are available, however.
Figure 4 shows a 66-block in use for a voice system. In this picture, you can see that parts of the 66-block connectors have bridging clips connecting them. This block also has a door that can be closed to protect the front of the block and prevent the bridging clips from being knocked off.

Photo courtesy of Computer Training Center

Figure 4: A 66-block used for voice applications
The most typical type of cable connected to a 66-block is the 25-pair cable. The wiring pattern used with the 66-block is shown in Figure 5. If you look at a 66-block, you will notice notches in the plastic clips on the left and right side. These notches indicate the beginning of the next binder group.

 
Figure 5: The 66-block wire color/pin assignments for 25-pair cables
Note 
The T568-A and T568-B wiring patterns do not apply to 66-blocks.
If you were to use 66-blocks and four-pair UTP cables instead of 25-pair cables, then the wire color/pin assignments would be as shown in Figure 6.

 
Figure 6: The 66-block wire color/pin assignments for four-pair cables

Tuesday, November 15, 2011

Sample Data Installations


As long as you follow the ANSI/TIA-568-C standard, most of your communications infrastructure will be pretty similar and will not vary based on whether it is supporting voice or a specific data application. The horizontal cables will all follow the same structure and rules. However, when you start using the cabling for data applications, you'll notice some differences. We will now take a look at a couple of possible scenarios for using a structured cabling system.
The first scenario, shown in Figure 1, shows the typical horizontal cabling terminated to a patch panel. The horizontal cable terminates to the 110-block on the back of the patch panel. When a workstation is connected to the network, it is connected to the network hub by means of a RJ-45 patch cable that connects the appropriate port on the patch panel to a port on the hub.

 
Figure 1: A structured cabling system designed for use with data
The use of a generic patch panel in Figure 2 allows this cabling system to be the most versatile and expandable. Further, the system can also be used for voice applications if the voice system is also terminated to patch panels.
Another scenario involves the use of 110-blocks with 50-pin Telco connectors. These 50-pin Telco connectors are used to connect to phone systems or to hubs that are equipped with the appropriate 50-pin Telco interface. These are less versatile than patch panels because each connection must be terminated directly to a connection that connects to a hub.
In past years, we have worked with these types of connections, and network administrators have reported to us that these are more difficult to work with. Further, these 50-pin Telco connectors may not be interchangeable with equipment you purchase in the future. Figure 3 shows the use of a 110-block connecting to network equipment using a 50-pin Telco connector.

 
Figure 2: A structured cabling system terminated into 110-connecting blocks with 50-pin Telco connectors
A final scenario that is a combination of the patch-panel approach and the 110-block approach is the use of a 110-block and 110-block patch cables. This is almost identical to the patch-panel approach, except that the patch cables used in the telecommunications closet have a 110-block connector on one side and an RJ-45 on the other. This configuration is shown in Figure 3.
Image from book 
Figure 3: Structured cabling using 110-blocks and 110-block patch cords
The previous examples are fairly simple and involve only one wiring closet. Any installation that requires more than one telecommunications closet and also one equipment room will require the service of a data backbone. Figure 4 shows an example where data backbone cabling is required. Due to distance limitations on horizontal cable when it is handling data applications, all horizontal cable is terminated to network equipment (hubs) in the telecommunications closet. The hub is then linked to other hubs via the data backbone cable.

 
Figure 4: Structured cabling that includes data backbone cabling

Friday, November 11, 2011

110-Blocks | Copper Cable for Data Applications


The telecommunications industry used the 66-style block for many years, and it was considered the mainstay of the industry. The 66-blocks were traditionally used only for voice applications; though we have seen them used to cross-connect data circuits, this is not recommended. The 110-blocks are newer than 66-blocks and have been designed to overcome some of the problems associated with 66-blocks. The 110-blocks were designed to support higher-frequency applications, accommodate higher-density wiring arrangements, and better separate the input and output wires.

The standard 66-block enabled you to connect 25 pairs of wires to it, but the 110-blocks are available in many different configurations supporting not only 25 pairs of wire but 50, 100, 200, and 300 pairs of wires as well. The 110-block has two primary components: the 110 wiring block on which the wires are placed, and the 110-connecting block (shown in Figure 1), which is used to terminate the wires. A 110-wiring block will consist of multiple 110-connector blocks; there will be one 110-connector block for each four-pair cable that must be terminated.

 
Figure 1: The 110-connector block
The 110-wiring block will consist of a few or many rows of 110-connector blocks. The wires are inserted into the connecting block and terminated by a punch-down tool or vendor-specific tool. These blocks are a type of IDC (insulation displacement connector); as the wires make contact with the metal on the blocks, the insulation is sliced, and the metal makes contact with the conductor. Remember, to prevent excessive crosstalk, don't untwist the pairs more than 0.5 inches for Category 5e, and 0.375 inches for Category 6 cable, when terminating onto a 110-connecting block.
The 110-blocks come in a wide variety of configurations. Some simply allow the connection of 110-block jumper cables. Figure 2 shows a 110-block jumper cable; one side of the cable is connected to the 110-block, and the other side is a modular eight-pin plug (RJ-45).


Photo courtesy of The Siemon Company

Figure 2: A 110-block to RJ-45 patch cable
Other 110-blocks have RJ-45 connectors adjacent to the 110-blocks, such as the one shown in Figure 3. If the application uses the 50-pin Telco connectors such as some Ethernet equipment and many voice applications do, 110-blocks such as the one shown in Figure 4 can be purchased that terminate cables to the 110-connecting blocks but then connect to 50-pin Telco connectors.

Photo courtesy of The Siemon Company

Figure 3: A 110-block with RJ-45 connectors on the front

Photo courtesy of The Siemon Company

Figure 4: A 110-block with 50-pin Telco connectors
You will also find 110-blocks on the back of patch panels; each 110-connecting block has a corresponding port on the patch panel. Figure 5 shows the 110-block on the back of a patch panel. The front side of the patch panel shown in Figure 6 shows a 96-port patch panel; each port will have a corresponding 110-connecting block.


Photo courtesy of Computer Training Academy

Figure 4: A 110-block on the back side of a patch panel


Photo courtesy of MilesTek

Figure 5: A 96-port patch panel

Friday, November 4, 2011

Installing Copper Cable


When you start installing copper cabling, much can go wrong. Even if you have adequately planned your installation, situations can still arise that will cause you problems either immediately or in the long term. Here are some tips to keep in mind for installing copper cabling:
  • Do not untwist the twisted pairs at the cable connector or anywhere along the cable length any more than necessary (less than 0.5 for Category 5e, and less than 0.375 for Category 6).
  • Taps (bridged taps) are not allowed.
  • Use connectors, patch panels, and wall plates that are compatible with the cable.
  • When tie-wrapping cables, do not overtighten cable bundles. Instead of tie-wraps, use Velcro® type wraps. While they are more expensive, they are easily reused if the cables require rearrangement.
  • Staples are not recommended for fastening cables to supports.
  • Never splice a data cable if it has a problem at some point through its length; run a new cable instead.
  • When terminating, remove as little of the cable's jacket as possible, preferably less than three inches. When finally terminated, the jacket should be as close as possible to where the conductors are punched down.
  • Don't lay data cables directly across ceiling tiles or grids. Use a cable tray, J hook, horizontal ladder, or other method to support the cables. Avoid any sort of cable-suspension device that appears as if it will crush the cables.
  • Follow proper grounding procedures for all equipment to reduce the likelihood of electrical shock and reduce the effects of EMI.
  • All voice runs should be home-run, not daisy-chained. When wiring jacks for home or small office telephone use, the great temptation is to daisy-chain cables together from one jack to the next. Don't do it. For one thing, it won't work with modern PBX (private branch exchange) systems. For another, each connection along the way causes attenuation and crosstalk, which can degrade the signal even at voice frequencies.
  • If you have a cable with damaged pairs, replace it. You will be glad you did. Don't use another unused pair from the same cable because other pairs may be damaged to the point where they only cause intermittent problems, which are difficult to solve. Substituting pairs also prevents any future upgrades that require the use of all four pairs in the cable.

Pulling Cable

If you are just starting out in the cabling business or if you have never been around cable when it is installed, the term pulling cable is probably not significant. However, any veteran installer will tell you that pulling is exactly what you do. Cable is pulled from boxes or spools, passed up into the ceiling, and then, every few feet, the installers climb into the ceiling and pull the cable along a few more feet. In the case of cable in conduit, the cable is attached to a drawstring and pulled through.
While the cable is pulled, a number of circumstances can happen that will cause irreparable harm to the cable. But you can take steps to make sure that damage is avoided. Here is a list of copper-cabling installation tips:
  • Do not exceed the cable's minimum bend radius by making sharp bends. The bend radius for four-pair UTP cables should not be less than four times the cable diameter and not less than 10 times the cable diameter for multi-pair (25-pair and greater cable). Avoid making too many 90-degree bends.
  • Do not exceed maximum cable pulling tension (110N or 25 pounds of force for four-pair UTP cable).
  • When pulling a bundle of cables, do not pull cables unevenly. It is important that all the cables share the pulling tension equally.
  • When building a system that supports both voice and data, run the intended voice lines to a patch panel separate from the data lines.
  • Be careful not to twist the cable too tightly; doing so can damage the conductors and the conductor insulation.
  • Avoid pulling the cable past sources of heat such as hot-water pipes, steam pipes, or warm-air ducts.
  • Be aware that damage can be caused by all sorts of other evil entities such as drywall screws, wiring-box edges, and other sharp objects found in ceilings and walls.
New cable is shipped in reels or coils. Often the reels are in boxes and the cable easily unspools from the boxes as you pull on it. Other times, the cable reels are not in a box, and you must use some type of device to allow the reel to turn freely while you pull the cable. In these cases, a device similar to the one pictured in Figure 1 may be just the ticket. These are often called wire-spool trees. For emergency or temporary use, a broomstick or piece of conduit through a stepladder will work.

 
Figure 1: A reel for holding spools of cable to make cable pulling easier
When the coils are inside a box, you dispense the cable directly from the box by pulling on it. You should never take these coils from the box and try to use them. The package is a special design and without the box the cable will tangle hopelessly.
Tip 
When troubleshooting any wiring system, disconnect the data or voice application from both sides (the phone, PC, hub, and PBX). This goes for home telephone wiring, too!

Separating Voice and Data Patch Panels

Some installations of voice and data cabling will terminate the cabling on the same patch panel. Although this is not entirely frowned upon by cabling professionals, many will tell you that it is more desirable to have a separate patch panel dedicated to voice applications. This is essential if you use a different category of cable for voice than for data (such as if you use Category 5e cable for data but Category 3 cable for voice).
In the example in Figure 2, the wall plate has two eight-position modular outlets (one for voice and one for data). The outlets are labeled V1 for voice and D1 for data. In the telecommunications closet, these two cables terminate on different patch panels, but each cable goes to position 1 on the patch panel. This makes the cabling installation much easier to document and to understand. The assumption in Figure 2 is that the voice system is terminating to a patch panel rather than a 66-block. The voice system is then patched to another patch panel that has the extensions from the company's PBX, and the data port is patched to a network hub.

 
Figure 2: Using separate patch panels for voice and data

Sheath Sharing

The ANSI/TIA-568-C standard does not specifically prohibit sheath sharing—that is, when two applications share the same sheath—but its acknowledgment of this practice is reserved for cables with more than four pairs. Occasionally, though, someone may decide that he or she cannot afford to run two separate four-pair cables to a single location and may use different pairs of the cable for different applications. Table 7.5 shows the pin arrangement that might be used if a splitter were employed. Some installations may split the cable at the wall outlet and patch panel rather than using a splitter.
Table 1: Shared-Sheath Pin Assignments 
Pin Number
Usage
T568-A Wire Color
T568-B Wire Color
Pin 1
Ethernet transmit +
White/green
White/orange
Pin 2
Ethernet transmit –
Green
Orange
Pin 3
Ethernet receive +
White/orange
White/green
Pin 4
Phone inner wire 1
Blue
Blue
Pin 5
Phone inner wire 2
White/blue
White/blue
Pin 6
Ethernet receive 
Orange
Green
Pin 7
Phone inner wire 3
White/brown
White/brown
Pin 8
Phone inner wire 4
Brown
Brown
When two applications share the same cable sheath, performance problems can occur. Two applications (voice and data or data and data) running inside the same sheath may interfere with one another. Applications operating at lower frequencies such as 10Base-T may work perfectly well, but higher-frequency applications such as 100Base-TX will operate with unpredictable results. Also, as previously noted, two applications sharing the same four-pair cable sheath will prevent future upgrades to faster LAN technologies such as Gigabit Ethernet.
Because results can be unpredictable, and because you probably want to future-proof your installation, we strongly recommend that you never use a single four-pair cable for multiple applications. Even for home applications where you may want to share voice and data applications (such as Ethernet and your phone service), we recommend separate cables. The ringer voltage on a home telephone can disrupt data transmission on adjacent pairs of wire, and induced voltage could damage your network electronics.

Avoiding Electromagnetic Interference

All electrical devices generate electromagnetic fields in the radio frequency (RF) spectrum. These electromagnetic fields produce EMI and interfere with the operation of other electric devices and the transmission of voice and data. You will notice EMI if you have a cordless or cell phone and you walk near a microwave oven or other source of high EMI.
Data transmission is especially susceptible to disruption from EMI, so it is essential that cabling installed with the intent of supporting data (or voice) transmissions be separated from EMI sources. Here are some tips that may be helpful when planning pathways for data and voice cabling:
  • Data cabling must never be installed in the same conduit with power cables. Aside from the EMI issue, it is not allowed by the NEC.
  • If data cables must cross power cables, they should do so at right angles.
  • Power and data cables should never share holes bored through concrete, wood, or steel. Again, it is an NEC violation as well as an EMI concern.
  • Telecommunication outlets should be placed at the same height from the floor as power outlets, but they should not share stud space.
  • Maintain at least 2 of separation from open electrical cables up to 300 volts. Six inches is a preferred minimum separation.
  • Maintain at least 6 of separation from lighting sources or fluorescent-light power supplies.
  • Maintain at least 4 of separation from antenna leads and ground wires.
  • Maintain at least 6 of separation from neon signs and transformers.
  • Maintain at least 6 of separation from lightning rods and wires.
  • Other sources of EMI include photocopiers, microwave ovens, laser printers, electrical motors, elevator shafts, generators, fans, air conditioners, and heaters.

Tuesday, November 1, 2011

Best Practices for Copper Installation


Based on our experience installing copper cabling, we created guidelines for you to follow to ensure that your UTP cabling system will support all the applications you intend it to. These guidelines include the following:
  • Following standards
  • Making sure you do not exceed distance limits
  • Good installation techniques

Following Standards

One of the most important elements to planning and deploying a new telecommunications infrastructure is to make sure you are following a standard. In the United States, this standard is the ANSI/TIA-568-C Commercial Building Telecommunications Cabling Standard. It may be purchased from Global Engineering Documents on the Internet atwww.global.ihs.com. We highly recommend that anyone designing a cabling infrastructure own this document.
Tip 
Have you purchased or do you plan to purchase the ANSI/TIA-568-C standard? We recommend that you buy the entire TIA/EIA Telecommunications Building Wiring Standards collection on CD from Global Engineering (www.global.ihs.com). This is a terrific resource (especially from which to cut and paste sections into an RFP) and can be purchased with a subscription that lets you receive updates as they are published.
Following the ANSI/TIA-568-C standard will ensure that your cabling system is interoperable with any networking or voice applications that have been designed to work with that standard.
Standards development usually lags behind what is available on the market, as manufacturers try to advance their technology to gain market share. Getting the latest innovations incorporated into a standard is difficult because these technologies are often not tested and deployed widely enough for the standards committees to feel comfortable approving them.
Tip 
If a vendor proposes a solution to you that has a vendor-specific performance spin on it, make sure it is backward-compatible with the current standards. Also ask the vendor to explain how their product will be compatible with what is still being developed by the standards workgroups.

Cable Distances

One of the most important things that the ANSI/TIA-568-C standard defines is the maximum distance that a horizontal cable should traverse. The maximum distance between the patch panel (or cross-connection, in the case of voice) and the wall plate (the horizontal portion of the cable) must not exceed 90 meters (285). Further, the patch cord used in the telecommunications closet (patch panel to hub or cross-connection) cannot exceed 5 meters (16), and the patch cord used on the workstation side must not exceed 5 meters (16).
You may find that higher-quality cables will allow you to exceed this distance limit for older technologies such as 10Base-T Ethernet or 100VG-AnyLAN. However, you are not guaranteed that those horizontal cable runs that exceed 90 meters will work with future technologies designed to work with TIA/EIA standards, so it is strongly recommended that you follow the standard and not "customize" your installation.
Some tips relating to distance and the installation of copper cabling include:
  • Never exceed the 90-meter maximum distance for horizontal cables.
  • Horizontal cable rarely goes in a straight line from the patch panel to the wall plate. Don't forget to account for the fact that horizontal cable may be routed up through walls, around corners, and through conduit. If your horizontal cable run is 90 meters (295) as the crow flies, it's too long.
  • Account for any additional cable distance that may be required as a result of trays, hooks, and cable management.
  • Leave some slack in the ceiling above the wiring rack in case re-termination is required or the patch panel must be moved; cabling professionals call this a service loop. Some professional cable installers leave as much as an extra 10 in the ceiling bundled together or looped around a hook (as seen in Figure 1).
     
    Figure 1: Leaving some cable slack in the ceiling

Wiring Patterns

The ANSI/TIA-568-C standard recommends one of two wiring patterns for modular jacks and plugs: T568-A and T568-B. The only difference between these wiring patterns is that pin assignments for pairs 2 and 3 are reversed. However, these two wiring patterns are constantly causing problems for end users and weekend cable installers. What is the problem? Older patch panels and modular wall-plate outlets came in either the T568-A or T568-B wiring patterns. The actual construction of these devices is exactly the same, but they are color coded according to either the T568-A wiring standard or the T568-B wiring standard. Newer connecting hardware is usually color coded so that either configuration can be used. The confusion comes from people wondering which one to use. It doesn't matter—they both work the same way. But you have to be consistent at each end of the cable. If you use T568-A at one end, you must use it at the other; likewise with T568-B.
The cable pairs are assigned to specific pin numbers. The pins are numbered from left to right if you are looking into the modular jack outlet or down on the top of the modular plug. Figure 2 shows the pin numbers for the eight-position modular jack (RJ-45) and plug.

 
Figure 2: Pin positions for the eight-position modular plug and jack