Thursday, October 6, 2011

Optical Fiber Testers


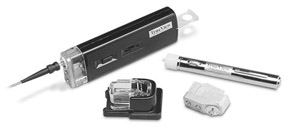
Optical fiber requires a unique class of cable testers. Just like copper-cable testers, optical fiber testers are specialized. Figure 1 shows a simple continuity tester that verifies light transmission through the cable.

Figure 1: An optical fiber continuity tester
Another type of optical fiber test device is the power meter (also known as an attenuation tester), such as the one shown in Figure 2. Like the continuity tester, the power meter tests whether light is making its way through the cable, but it also tests how much of the light signal is being lost. Anyone installing fiber-optic cable should have a power meter. Most problems with optical fiber cables can be detected with this tool. Good optical fiber power meters can be purchased for less than $1,000.


Figure 2: An optical fiber power meter
Note 
An attenuation tester checks for how much signal is lost on the cable, whereas a continuity tester only measures whether light is passing through the cable.
Many high-end cable testers, such as those available from Hewlett-Packard, Microtest, and others, can test both optical fiber and copper cables (provided you have purchased the correct add-on modules). You need to know a few points when you purchase any type of optical fiber tester:
  • The tester should include the correct fiber connectors (ST, SC, FC, LC, MT-RJ, etc.) for the types of connectors you will be using.
  • The tester should support the type of fiber-optic cable you need to test (single-mode or multimode).
  • A power meter should test the wavelength at which you require the cable to be used (usually 850 or 1,300nm).
Professional fiber-optic cable installers usually carry tools such as an OTDR that perform more advanced tests on optical fiber cable. OTDRs are not for everyone, as they can easily cost in excess of $30,000. However, they are an excellent tool for locating faults.

Monday, September 26, 2011

Twisted-Pair Continuity Tester & Coaxial Tester


Twisted-Pair Continuity Tester

Many of the common problems of getting cables to work are simple ones. The $5,000 cable testers are nice, but for simple installations they are overkill. If the cable installer is not careful during installation, the cable's wire pairs may be reversed, split, or otherwise incorrectly wired. A simple continuity tester can help you solve many of the common problems of data and voice twisted-pair cabling by testing for open circuits and shorts.
Figure 1 shows a simple continuity tester from IDEAL DataComm; this tester (the LinkMaster Tester) consists of the main testing unit and a remote tester. The remote unit is patched into one side of the cable, and the main unit is patched into the other side. It can quickly and accurately detect common cabling problems such as opens, shorts, reversed pairs, or split pairs. Cable testers are available from many vendors and sell for under $100. Testers such as these can save you many hours of frustration as well as the hundreds or even thousands of dollars that you might spend on a more sophisticated tester.

Figure 1: IDEAL's LinkMaster Tester

Coaxial Tester

Although coaxial cable is a little less complicated to install and terminate, problems can still arise during installation. The tester shown in Figure 2 is the IDEAL DataComm Mini Coax Tester. This inexpensive, compact tester is designed to test coax-cable runs terminated with BNC-style connectors. It can test two modes of operation: standard and Hi-Z for long runs. Coaxial-cable testers will quickly help you identify opens and shorts.

Figure 2: IDEAL's Mini Coax Tester

Friday, September 23, 2011

Cable Testing - A Cable-Toning Tool


A cable toner is a device for determining if the fundamental cable installation has been done properly. It should be noted that we are not discussing the sophisticated type of test set required to certify a particular level of performance, such as a Category 5e link or channel. 
In its simplest form, the toner is a simple continuity tester that confirms that what is connected at one end is electrically continuous to the other end. An electrical signal, or tone, is injected on the circuit being tested and is either received and verified on the other end or looped back for verification on the sending end. Some tools provide visual feedback (with a meter), whereas others utilize audio feedback. Testing may require that you have a partner at the far end of the cable to administer the inductive probe or loop-back device (this can also be accomplished with a lot of scurrying back and forth on your part). Figure 1 shows a tone generator, and Figure 2 shows the corresponding amplifier probe.

Figure 1: A tone generator


Figure 6.20: An amplifier probe
More sophisticated testers will report not only continuity but also length of run, and will check for shorts and crosses (accidental contact of one conductor with another), reversed pairs, transposed pairs, and split pairs.

Tuesday, September 20, 2011

Common Cabling Tools - Punch-Down Tools


Twisted-pair cables are terminated in jacks, cross-connect blocks (66-blocks), or patch panels (110-blocks) that use insulation displacement connectors (IDCs). Essentially, IDCs are little knife blades with a V-shaped gap or slit between them. You force the conductor down into the V and the knife blades cut through the insulation and make contact with the conductor. Although you could accomplish this using a small flat-blade screwdriver, doing so is not recommended. It would be sort of like hammering nails with a crescent wrench. The correct device for inserting a conductor in the IDC termination slot is a punch-down tool.


Different blades are used depending on whether you are going to be terminating on 110-blocks or 66-blocks. Although the blades are very different, most punch-down tools are designed to accept either. In fact, most people purchase the tool with one and buy the other as an accessory, so that one tool serves two terminals.
A punch-down tool is really just a handle with a special "blade" that fits a particular IDC. There are two main types of IDC terminations: the 66-block and the 110-block. The 66-block terminals have a long history rooted in voice cross-connections. The 110-block is a newer design, originally associated with AT&T but now generic in usage. In general, 110-type IDCs are used for data, and 66-type IDCs are used for voice, but neither is absolutely one or the other.
Blades are designed with one end being simply for punch-down. When you turn the blade and apply the other end, it punches down and cuts off excess conductor in one operation. Usually you will use the punch-and-cut end, but for daisy-chaining on a cross-connection, you would use the end that just punches down.
Tip 
If you are terminating cables in Krone or BIX (by NORDX) equipment, you will need special punch-down blades. These brands use proprietary IDC designs.
Punch-down tools are available as nonimpact in their least expensive form. Nonimpact tools generally require more effort to make a good termination, but they are well suited for people who only occasionally perform punch-down termination work. Figure 1 shows a typical nonimpact punch-down tool.

Figure 1: IDEAL DataComm's nonimpact punch-down tool
The better-quality punch-down tools are spring-loaded impact tools. When you press down and reach a certain point of resistance, the spring gives way, providing positive feedback that the termination is made. Typically, the tool will adjust to high- and low-impact settings. Figure 2 shows an impact punch-down tool. Notice the dial near the center of the tool—it allows the user to adjust the impact setting. The manufacturer of the termination equipment you are using will recommend the proper impact setting.

Figure 2: IDEAL DataComm's impact tool with adjustable impact settings
With experience, you can develop a technique and rhythm that lets you punch down patch panels and cross-connections very quickly. However, nothing is so frustrating as interrupting your sequence rhythm because the blade stayed on the terminal instead of in the handle of the tool. The better punch-down tools have a feature that locks the blade in place, rather than just holding it in with friction. For the occasional user, a friction-held blade is okay, but for the professional, a lock-in feature is a must that will save time and, consequently, money.
Tip 
You should always carry at least one extra blade for each type of termination that you are doing. Once you get the hang of punch-downs, you'll find that the blades don't break often, but they do break occasionally. The cutting edge will also become dull and stop cutting cleanly. Extra blades are inexpensive and can be easily ordered from the company you purchased your punch-down tool from.
Some brands of 110-block terminations support the use of special blades that will punch down multiple conductors at once, instead of one at a time.
If you are punching down IDC connectors on modular jacks from The Siemon Company that fit into modular wall plates, a tool from that company may be of use to you. Rather than trying to find a surface to hold the modular jack against, you can use the Palm Guard (see Figure 3) to hold the modular jack in place while you punch down the wires.

Figure 3: The Palm Guard
Tip 
A 4 square of carpet padding or mouse pad makes a good palm protector when punching down cable on modular jacks.